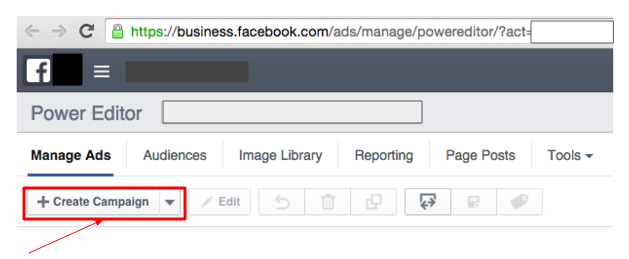
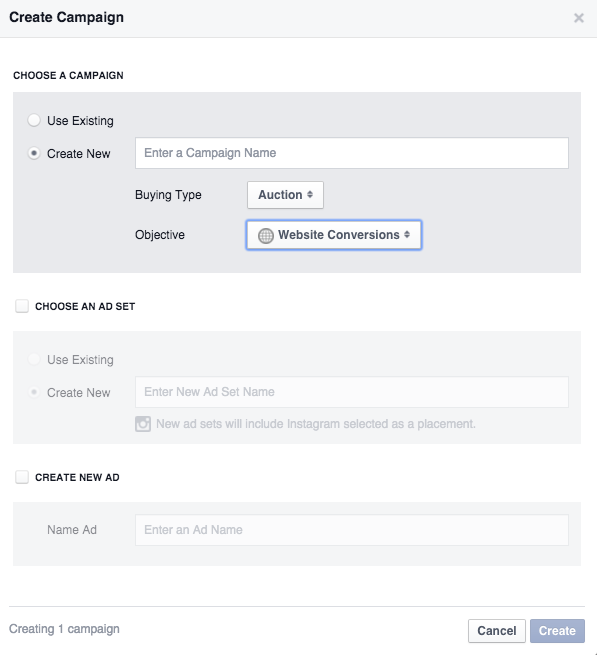
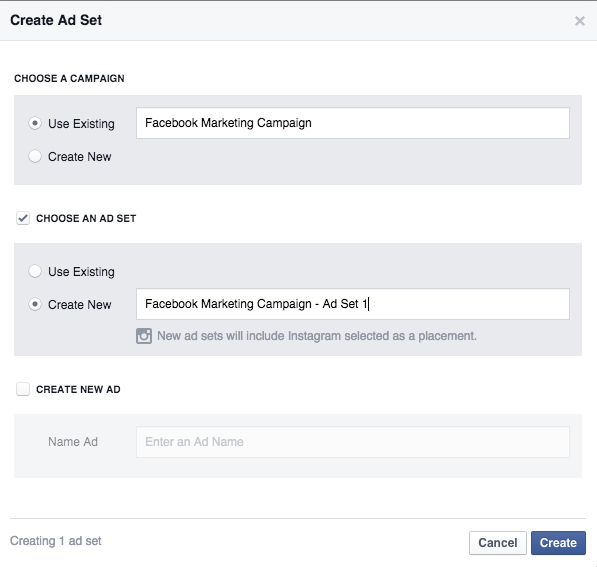
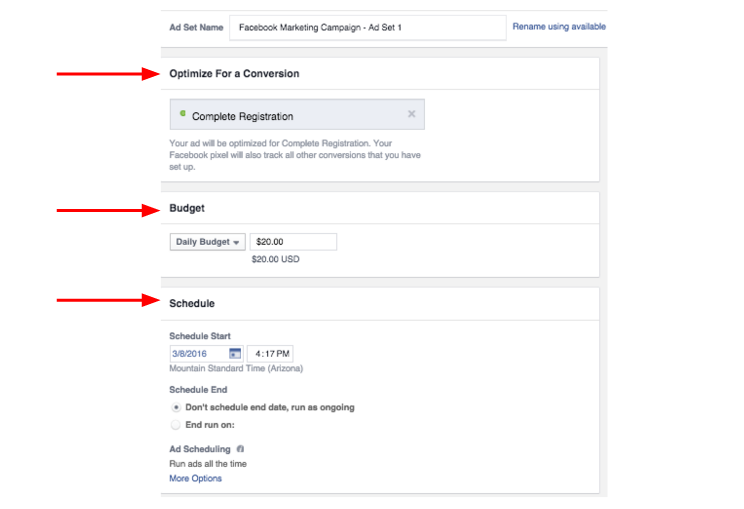
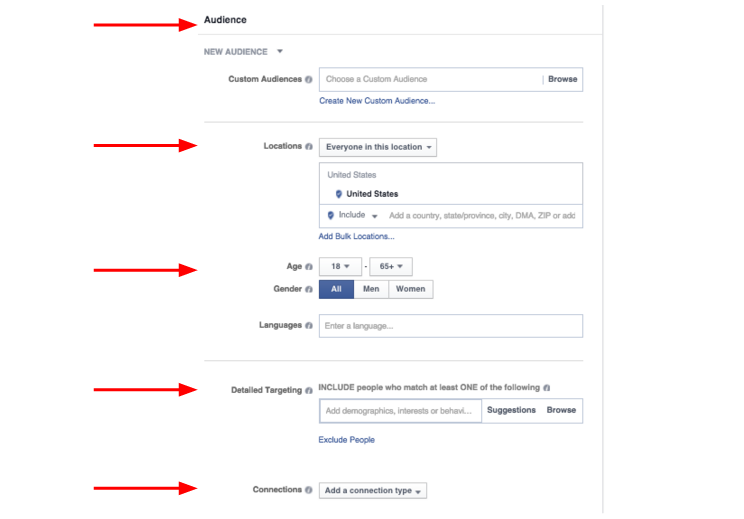
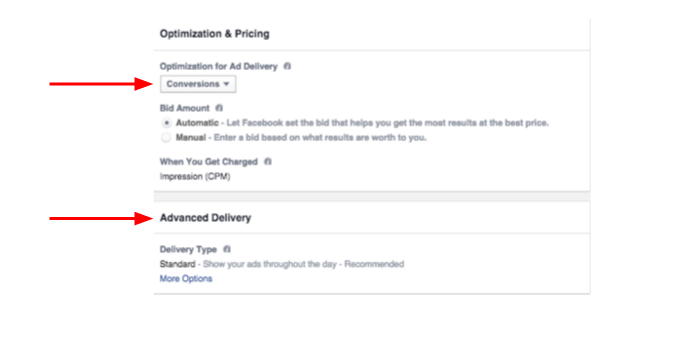
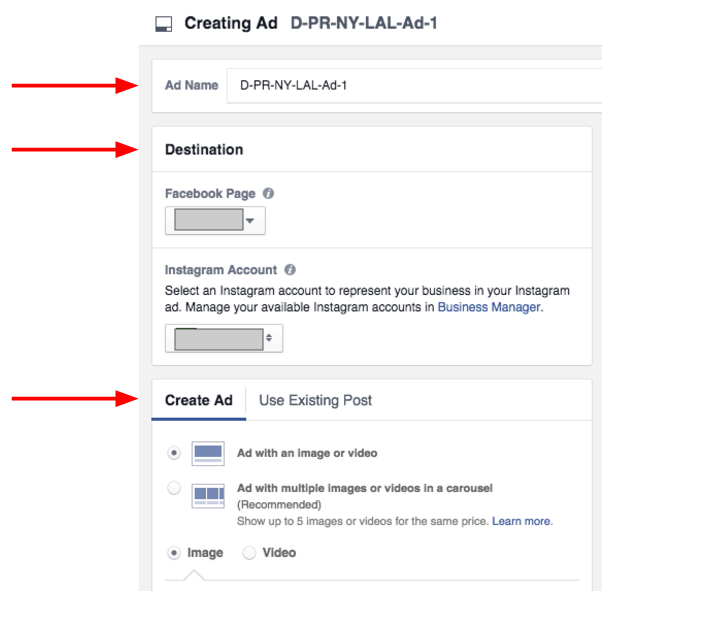
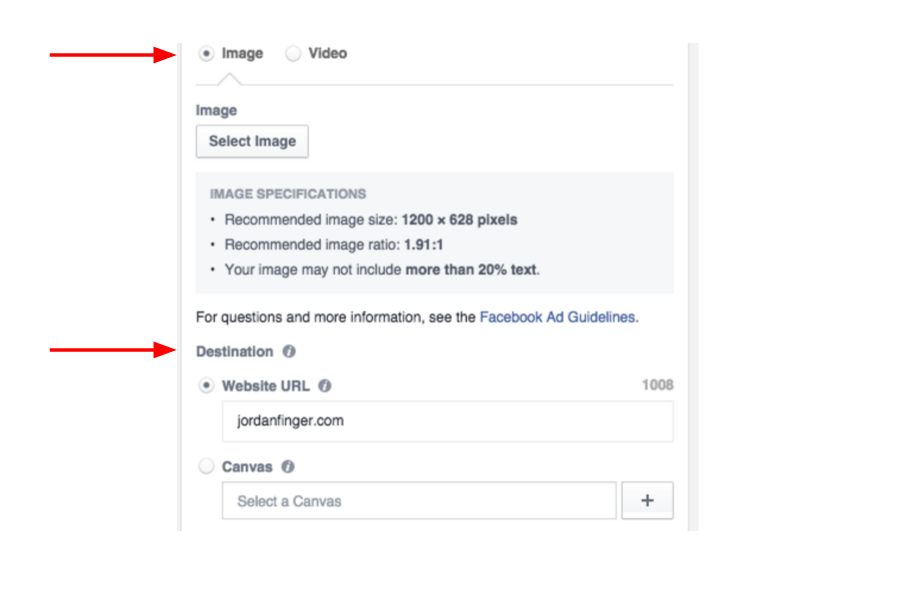
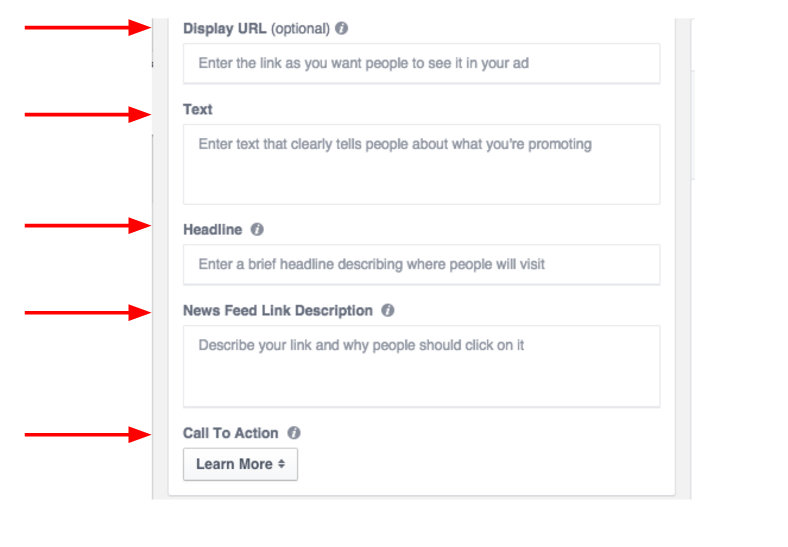
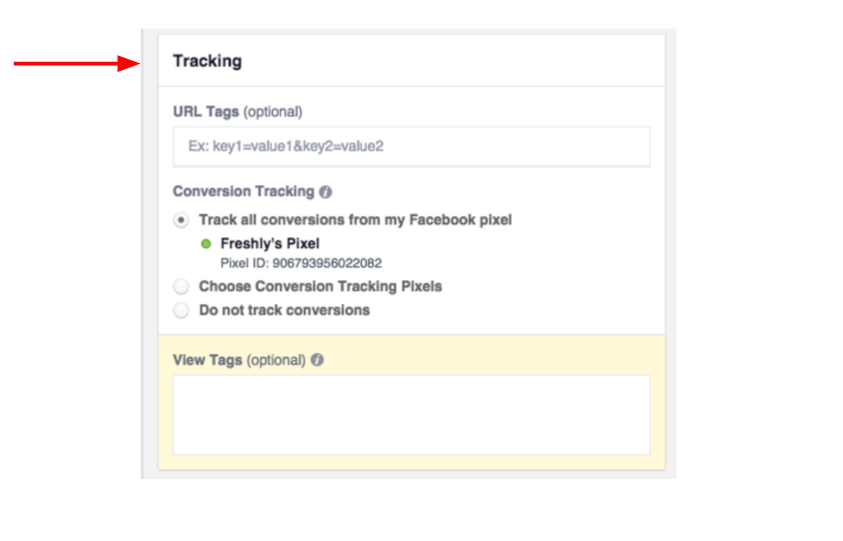
Facebook Power Editor Tutorial 2016 - 5 Easy Steps To Launch A Facebook Marketing Campaign3/11/2016 Author: Jordan Finger Step 1: Download Facebook Power EditorTo build a Facebook marketing campaign in the Facebook Power Editor tool, you need to first log into your Facebook Ads Manager account and then click on Power Editor and download Facebook Power Editor for your Facebook Ads Manager account. Step 2: Create A CampaignOnce you have downloaded Facebook Power Editor, click on Manage Ads and then click + Create Campaign. A pop-up window, as follows, will give you the option to set the campaign parameters to define the goal you want to achieve with your campaign. In the example, I am setting the campaign goal to optimize for website conversions and set Buying Type to Auction which means you will be bidding on Facebook ads in the Facebook real-time auction to win impressions and increase ad reach to your target audience. Give your campaign a name and click Create at the bottom right of the pop up. Creating a Facebook Campaign is now completed. Step 3: Create An Ad SetOnce you have created your Facebook campaign, you will next select Create Ad Set from the same drop down menu as indicated above. You will receive a pop up window as seen below. You will choose the campaign that you just created and then in the section that says, Choose An Ad Set, select Create New and put in the name for your new Ad Set. The Ad Set will be how you define the audience that will want to target. Within a campaign, you will create multiple Ad Set's to test how different audience respond to your advertisement. It is recommended to use a naming convention that is relevant to the audience you are creating. My best practice, is I use a series of initials that I then also use in the Ad Content of my unique utm that I create for the ad campaign. EXAMPLE: D-PR-NY-LAL - In this example, I use "D" to indicate that I will be targeting an audience on Facebook desktop. "PR" is for prospecting a new audience versus I would use "RT" if I was running a re-targeting audience campaign. "NY" is targeting New York for this ad set. "LAL" is a look-a-like-audience that I may have built based on my best customers. Once you have created the Ad Set, the fun part of defining your target audience begins. Optimize For a Conversion: This is where you define the event that you want to optimize your campaign for. In the example provided below, I will be optimizing to "Complete Registration" which is for a top of funnel email registration. By testing this event you are indicating to the Facebook algorithm what event you want for them to help you reach the audience most likely to complete this event on your ad campaign. Budget: This is where you set the ad spend you want to use for this given Ad Set. You have the option to do a Daily Budget or a Lifetime Budget. In my example, I am using a Daily Budget which means the most I am willing to spend per day for this Ad Set. Schedule: You have the option to let the Ad Set run indefinitely or set a given ad schedule as to when you want your ads to run against this Ad Set. Since I am usually running e-commerce campaigns with the goal of acquisitions everyday, I do not put an end date on my ad schedule. Next you will define the actual audience you want to target. Ill provide the highlights of how to create the audience and will go into much more detail in a future post. Custom Audience: To keep this simple, a Custom Audience is based on an audience you have created either based on your website traffic and/or a file that you have uploaded into Facebook. For this example, let's assume you have uploaded your best customer file and built a look-a-like audience that you want to target for a new customer prospecting campaign. You will to the Choose a Custom Audience field and find the look-a-like audience that you created that you want to target. Location: Let's assume you are promoting your product which can be shipped to everyone in the United States. You would select Everyone That Lives In This Location in the Location drop down menu and leave United States. If you are running a geo-target campaign you would simple remove United States and put in the location that you wish to target. Age/Gender: Option to select an age and gender segment for the audience you want to reach based on your ideally customer profile. Delivered Targeting: This is one of the most powerful targeting features that Facebook offers. This will allow you to set targeting criteria by interests, buying habits, education, income, marital status, generation, brands, etc. Connections: You can target your ads to users that have already become fans of your Facebook page. A few final audience targeting options to best optimize your campaign and set the ad spend pacing. Optimization for Ad Delivery: Previously we defined the criteria for Optimized for a Conversion based on the event that we want to optimize our campaign for. With the Optimization for Ad Delivery you have the ability to now set the price that you are willing to pay for this event to occur. You can set the Bid Amount to Automatic which means Facebook will make an algorithmic decision to get you the most results for what they deem is the best price for this event to occur. This can be very effective in allowing your campaign to win auction bidding to get ad reach to your prospective audience but also the CPA may come in higher then what you may be willing to pay for the conversion event. The other option is to select Manual Bid Amount. Here you can set the maximum dollar amount you are willing to pay for the conversion event to occur. This is a better way to control your CPA from your Facebook ad campaigns. The downside is that you may set a Bid Amount that is to low for you to win bids in the auction and it may limit your ad to reach your prospective audience. Advanced Delivery: This is the pace that you tell Facebook to spend the allocated ad budget for this given audience Ad Set. Let's say that you have set your campaign to run on a daily budget and you set the Advanced Delivery to Standard. Facebook will then allocate the given ad budget over a 24 hour period. The other option is to set the Delivery Type to Accelerated which tells Facebook to spend the ad budget as quickly as possible. Step 4: Create An AdOnce you have defined and create your audience segment by building the Facebook Ad Set, it is now time to create the actual ad that you want to run to this audience segment. Here are the basic steps for creating a Facebook Ad. Destination: You will select your Facebook Page that you will want to associate with your ad. You also have the option to now run your ads through Facebook Power Editor to show on Instagram. If you have an Instagram Account you will select it now as well. Create Ad: When creating an ad you have a few options. The most common is to create an Image Ad. This will be a static photo. A variation on the Image Ad is what Facebook calls a Carousel Ad which is the option to create an Image Ad with multiple photos. Facebook has published several case studies stating that Carousel Ads get higher engagement versus the traditional single Image Ad. A fast growing creative option is a Video Ad. To use video is not as simple as uploading an image due to the production and costs involved. However, videos are highly engaged and therefore, Facebook gives video a larger share of reach to your prospective audience. Select Image: Once you have decided on Image versus Video, you simply click the Select Image button to upload your image or video in compliance with the Facebook image specifications and requirements. Destination: Is what websites or landing page you want to send your ad traffic to. This URL will not be seen by the user, therefore, you can upload a unique UTM that will allow you to include your tracking parameters to the URL. Canvas is a new type of ad that Facebook is powering for mobile. Display URL: Is the URL that will be shown at the bottom left of your ad and will be visible to the user. Text: Is the ad copy that will go above the image. Headline: This is the most important copy on the ad. It is the BOLD copy that will go below the image that will draw the most attention from the viewer. News Feed Link Description: This is the non bold descriptive copy that will go below the Headline copy. Call To Action: Is a button option that Facebook allows you to add to your ad. It has various present Call To Action language on the button for you to select from. Tracking: You have the option to add your tracking parameters in the URL Tags if you did not create a unique UTM in the destination UTM. I do not use this feature since I create a unique UTM in the destination URL. However, Conversion Tracking is extremely important. This is where you make sure that your ad will track the conversion events that happen once a users clicks on your ad and comes to your site. Step 5: Launch Your Facebook Marketing CampaignOnce you have completed these steps you can now make your Facebook campaign live, Congratulations! To Recap the steps: 1) Download Power Editor 2) Create Your Campaign 3) Create Your Ad Set 4) Create Your Ad 5) Launch Your Campaign
3/11/2016 03:04:05 pm
Jordan, this totally demystified many questions. Thank you so much - I hope Facebook pays you to publish this to all their advertisers!
Reply
Your comment will be posted after it is approved.
Leave a Reply. |



 RSS Feed
